
Since we came up with the plan to renovate a vintage caravan for our lap of Australia, we’ve been obsessed with it. It feels like we’ve been thinking about the new layout and new look and all our plans forever. And we kind of have been!
We bought our van in October last year. The minute we laid eyes on it, we could see the vision of what we wanted to create. Since then our poor little van has been completely ripped apart, right down to it’s skeleton frame in most parts, and then from the bare bones of the frame we have been slowly putting it back together bit by bit.
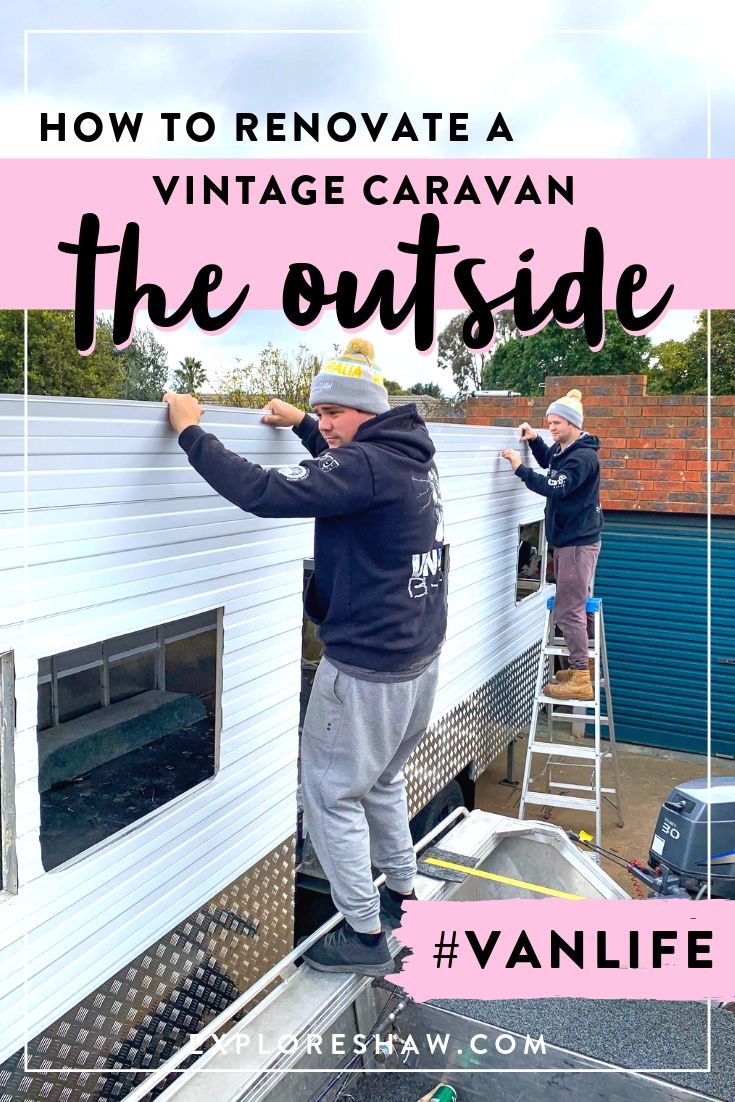
It’s been a long journey, but we’re finally getting there and it’s so rewarding to be able to finally close up the van again after months of it sitting in our drive way with no windows or doors and completely exposed to the elements. We’re going to publish a few posts in this how to renovate a vintage caravan series, but today we’re focusing on the first step – the outside.
Just a bit of a disclaimer, we’re sharing the details of the companies that we used and found helpful, but nothing in this post is sponsored. We just had such a difficult time finding good companies to work with in Victoria, that we wanted to share their details with you.

Our vans before photo – the day we brought it home
In this post:
What we wanted to change
We never actually planned to completely pull our van apart, but as we started getting into the renovation it quickly became clear that that was probably the best way to make it work.
At the beginning of the build our main plans for the outside was to give the van a brand new chassis and checker plate the bottom of the van to transform it into an off-road caravan. After that we wanted to –
- Remove the super old air conditioner at the front of the van and replace with a full length double window like we had at the back
- Move the door over a little bit so we could fit our bed at the front of the van
- Add one new window in at the front, which is where our bed is going to go
- Pull out all the windows and give them a real clean
- Give the whole van a complete paint job
The outside of our van quickly took over our life for at least the first seven months of this year. It’s been heaps of work and it took a lot longer than we thought, but it’s definitely worth it seeing it all come together!

When you start working on the windows on a clear morning and an hour later Melbourne offers you this
Roadblocks and issues throughout the renovation
Throughout all of this year, renovating has been our side hobby and we both work full time jobs. By the time we get home from work during the winter months, it’s already dark and we were limited with what we can do on the outside of the van.
One of the reasons the outside build took so long was because we were predominately working on it during winter. For most of the time, what we could do was limited by what the weather was going to be on the weekends. If it was going to be raining or very windy for the whole weekend, there were often weekends when we couldn’t really work on anything at all.
Closing the van up and finishing off the outside takes this problem away now, so we’re excited to start smashing out the inside renovation, because we can work on it almost every night and on the weekends as well.

Our van’s original inside, it was actually so pretty
The demolition of our van
Technically the inside of the van, but it did happen before anything else so it probably should be mentioned in this post as well. Getting to demo the van and rip everything out was actually pretty fun. Turns out destroying things is a great way to spend a few days! It didn’t take very long either, only a weekend to pull out all the insides of our van.
One thing we didn’t think about before we started was the insulation. OH WOW, HOW ANNOYING IS INSULATION. Our first encounter with it was when Thom pulled down a sheet from the roof, and a huge cloud of dust completely took over the van. It’s a good idea to maybe wear a face mask if you’re going to be pulling out insulation all day.


The second annoying thing about insulation is that it was literally everywhere and just completely crumbles as soon as you touch it. We had to pick up pieces so delicately and get them into a garbage bag super quickly before they just disintegrated into dust in our hands. I spent many many days pulling insulation out of every crack, ledge and frame of the van.
THANK GOD THAT IS OVER.
The Chassis
Getting a new chassis was a non-negotiable for Thom and it also turned into our biggest hassle, a months-long drama and the most anxiety inducing experience from the whole build.
The short story is that one day after we paid the deposit for the work on our chassis to begin, the company we were using went into receivership and we couldn’t get straight answers out of them for more than three months. For most of that time we actually thought that we had lost our van and didn’t know if we would even be able to get it back with or without the work done. If you want to hear the long story, we shared all the details in this blog post.
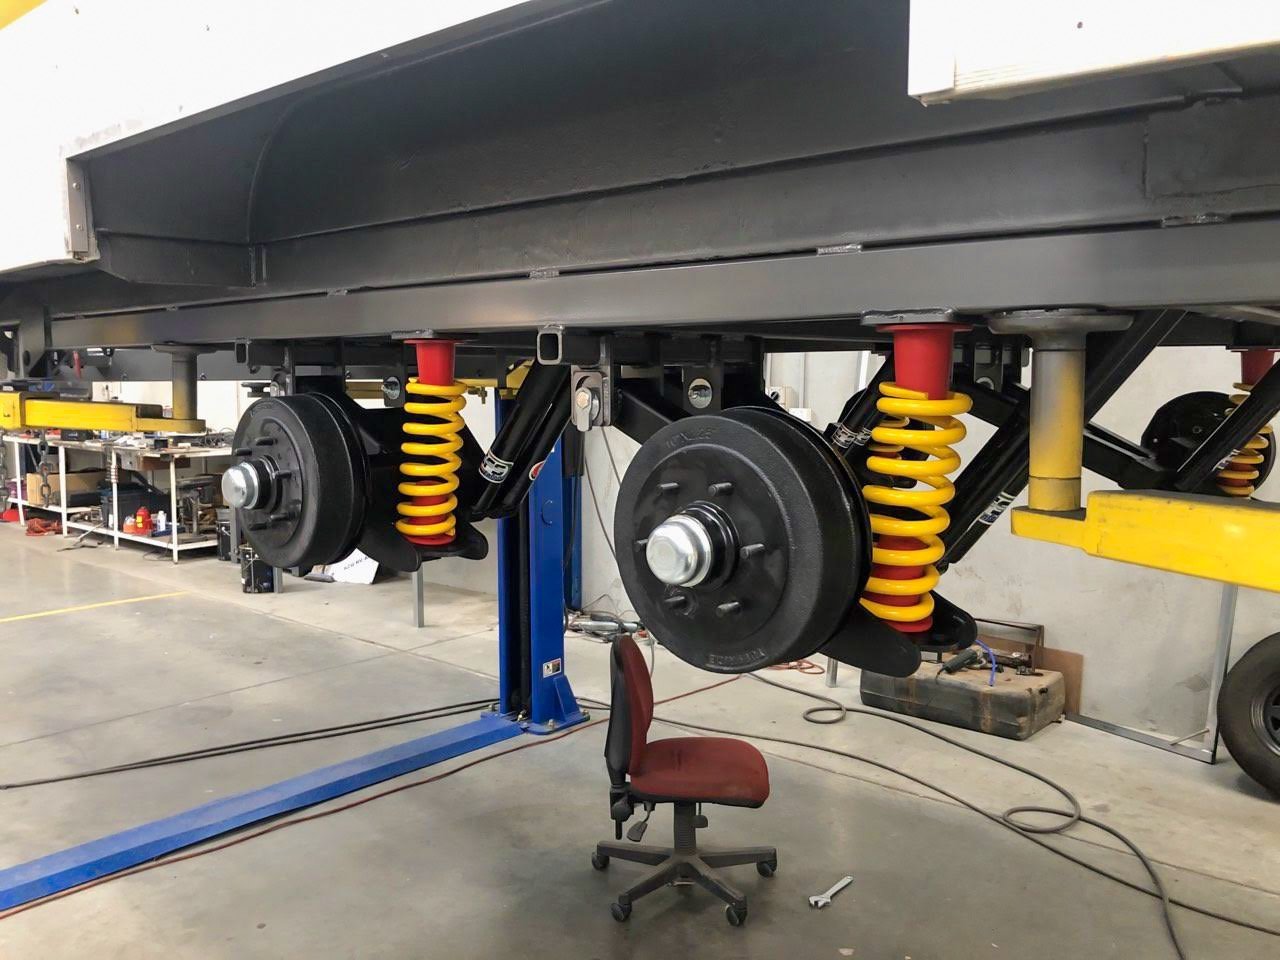
Thankfully the work finally got done in the end (after a new company bought out the old one) and now our new chassis is as strong as can be. It’s super tough and we should be able to be taken anywhere we want. The new chassis actually ended up being built straight onto the bottom of the van, giving it extra strength by using the chassis fame that was already there.


Some of the things we asked for on the new chassis were –
- Independent suspension
- A 1600mm draw bar
- An off-road hitch (DO35)
- Electric brakes
- Sway control
- 3.2 tonne rating
- Wheels to match our towing vehicle
- 3 water tanks
- Ground clearance
Just from photos and by looking at it you can see how much tougher the new chassis is compared to the old chassis. It’s super strong and sturdy, and we can’t wait to test it off-road.

The original cladding on the van
The outside cladding
We hadn’t planned to completely change the cladding on the van, we loved the old vintage cladding that it originally came from and it’s authentic look.
However, as we started to plan out the inside of the van we realised that we were going to have to move the door over a few centimetres to make sure we could fit our bed in at the front of the van. Once we figured out that the door was going to have to move it was almost like the more we looked at the cladding, the more we realised that we were going to have to source new cladding.
We wanted to try and find cladding that looked as close to the original as possible, but since our van is more than 40 years old that proved to be pretty difficult.
Trying to source new cladding as an independent person is no easy feat. The caravan industry is notoriously difficult to deal with, most people never got back to us, didn’t bother to return our enquiries or respond to our calls or emails.


Finally we came across Allytech Australia who are located in Campbellfield in Victoria. Look, their communication still could use some work, but they were the only people who took us seriously and actually got back to us, so we’re still grateful.
We purchased 14 lengths of the 6 metre smooth cladding from them. They were able to give us a couple of samples to hold up against the van and decide which style we thought would look best. Once we had put our order in they only needed a couple of days to have everything ready to pick up and finally we were a step closer.
In total it cost us $600.60 for the smooth cladding and we ended up having quite a bit spare, so we probably could have done a slightly smaller order.
Allytech Australia || 12 Bancell Street, Campbellfield || Ph: 9914 0122 || info@allytechaustralia.com.au

Cutting the curves into the cladding to match the vintage van
We also wanted to sheet the bottom of the van in checker-plate so give it a stronger bottom half in case rocks kick back at it in some of the more corrugated parts of the country. Checker-plate is available to buy from lots of different places and it cost us around $300 to sheet about a third of each side of the van.
The front and the back of the van we left with it’s original cladding. It was still in good condition and didn’t need to be changed for any real reason. Plus the view of the van from the back is just so cute!

We punched a whole bunch of pop rivets into an old boot box to spray them white so they would match the new cladding
The windows & van trim
The most tiresome, boring and frustrating part of our build so far was dealing with the windows. They’re so pretty but oh my god, they were so annoying! Every single window in our van has pretty much been completely pulled apart, restored, repaired, replaced and put back together.
The windows were not looking great. They were like 40 years old though, who could blame them. To begin with we organised to replace all the glass with extra strong plastic. This would reduce the risk of any windows breaking or cracking during our trip, especially on corrugated roads.
The first part was cleaning up the window frames. When we say that this was a boring and tedious task, that is an absolute understatement. It literally took us weeks to pull apart all those windows, clean them out (many had years worth of dirt and dust caked into the frames) and then clean all the silicone and paint off them so they looked a bit shiner and prettier.

Look at that difference! Before and after of our new window plastic, and how clean the frames came up in the end!
It took a lot of blood, sweat and tears to bring these back to life, but here were the steps we followed:
- Pulled each window apart, removed any old rubber from the window
- Cleaned out any remaining dirt (or sometimes mud) that was caught in the frame and pulled off any excess glue or silicone that was still stuck to the frame
- Wiped everything down with antibacterial wipes – not very environmentally friendly, but it was the best thing we could find the get off the majority of the marks/stains that were on the frames
- For any frames that had paint on them, we scrubbed them down with paint thinner and in some cases, nail polish remover (it actually worked better most of the time!)
- We then used a Josco 100mm Abrasive Nylon Wheel Brush on a drill to get rid of any extra pieces of glue, paint or rust that were a bit too stubborn to be scrubbed off
- Then we wiped everything down with mineral turpentine, and for the REALLY bad frames, we also used the a combination of aluminium de-oxsidiser purple polish to make it an extra bit shinier (check out the photo of everything we used before)
We also followed the same steps to clean up the trip that runs around the whole caravan, although these were in way worse condition than the window frames, often with a thick layer of silicone covering the whole trim. For these pieces we ending up using a Josco 50mm Spindle-Mounted Wheel Brush on a drill along the whole trim, absolutely every single piece of the trim was brushed down.
Grinding with the spindle-mount wheel brush can leave some scratches on the aluminium, but we found that if we continuously grind in the same direction and make sure we cover every piece of the trim it didn’t look like scratches at all. We also went over the trim lightly with the abrasive nylon wheel brush over the top as well and it actually came up really nice and shiny!


After that we still had to change all the plastic.
The most difficult part of this was finding someone who would be able to replicate the curved corner windows on each side of the van. It took many phone calls and a lot of frustrating dead ends before we came found Hendrick at Indesign Plastics + Display in Dandenong. He was an absolute legend and up for the challenge of making these unique windows for us.
They were ready in just a couple of weeks and cost us $300 for all four corner windows (I believe the actual cost was $150 per set). They fit perfectly inside the original frames and with a bit of window rubber and sealer, have made the corners of our caravan so much clearer!
Indesign Plastics + Display || 25 -27 Cheltenham Road, Dandenong || (03) 9791 4779 || info@indesignplastics.com.au
For the rest of the window plastic we ended up going to Warlond Plastics, only because it was so much closer to home compared to Indesign. We ordered 2 sheets of the clear poly-carbonate at 4.5mm and then they were able to cut it all to the different sizes that we needed for each window. That way, when we got it home, Thom only had to cut the curved edges on the bottom corner and they could slot right in. It cost us an additional $451 for the plastic for 10 windows on our van, including the cutting cost.


Left: The original window reveal once we took the windows out. Right: After the original reveals had been removed.
The old wooden window reveals at the front and the back of the caravan was also completely rotted out (check out the photo on the left above), once we took the windows out it was clear that we couldn’t keep them the way they were. Thom built new window reveals out of Tassie oak hardwood, that look absolutely beautiful and so much better! It was a little tricky to tetris all the different pieces of the end windows back together, but we got there in the end.
For the rest of our window repairs, Caravans Plus was pretty much our very best friend. They have an amazing step by step wind-out window repair guide on their website that tells you each and every step to take to fix up and replace different parts of your windows. These old style winder windows are pretty unique, so while parts can be relatively easy to find, they can definitely add up quickly in cost.
Originally we were going to try and salvage as many of the old window parts as we could, but the further into the window restoration we got, the more frustrating at difficult it became. In the end we literally just replaced everything, so that it was all nice and matching, and everything is clean and working correctly.

Fitting the new window reveals into the back of the van
Here’s the final shopping list of everything we ended up ordering from Caravans Plus. To match the originals as much as possible we chose to use the Starlite / Australite branded items:
- 10 Winder Control Boxes LEFT (4 large and 6 small)
- 10 Winder Control Boxes RIGHT (4 large and 6 small)
- 6 Cross Shaft Support
- 20 Windout Window End Plugs
- 10 Windout Window Handle Straight
- 20 Windout Window Link Box
- 20 Windout Window Slide Lock, 2 parts
- 4 Starlite Cross Shaft 762mm
- 6 Starlite Cross Shaft 1524mm
- 3 Round Bottom Corner Fly Screens for 280h x 1524w window
- 6 PVC Window Surround Moulding White 2.4m long 25x6mm
You can search for everything you need in their Windows & Doors section of their shop. We’re reluctant to even do the maths on how much we have spent on window things from Caravans Plus at this stage. Their shipping is calculated by weight, so that could get pretty pricey at times, but apart from that Caravans Plus literally saved our butt in this window reno, with everything delivered to us within about 2 days of our order being placed. It was so speedy and efficient!
Make sure you also check out their Caravan Articles & Guides section, where they literally have all kinds of handy step by step instructions to help you with your renovations.


The roof & the floor
Ripping the roof off our van might just have been the scariest part of the whole build for me. I don’t want to be dramatic, but I just really couldn’t understand the building side of the roof – how it would all go back together, and how we would make sure there were no leaks, gaps or cracks. Luckily Thom was a lot more confident than me, so I just stayed quiet and helped out wherever I could. And it seemed to work out great!
The old roof frame was just made out of timber, with only a couple of beams reinforced with some stronger steel. For the amount of weight we’re planning to put onto the roof, with an air-conditioner and a whole bunch of solar panels, it just wasn’t going to be strong enough. So everything came out and for a few days, we had absolutely no roof on the van. So glad we whipped the drone out to get a picture of that, it’s an insane view from up there.
We replaced the old frame with metal roof battens across the whole top of the van, adding two battens side by side anywhere we thought was going to be particularly load bearing. Over the top we used three sheets of aluminium composite sheeting to create the new roof. Plus there is SO MUCH sikaflex up there, honestly a drop of rain wouldn’t be able to find it’s way in anywhere! Thom used a combination of pop rivets and heavier screws to hold down the roof sheets and then our original trim went back onto each side to tie it all together.

I’m not sure whether we actually needed a new floor, or if Thom just wanted to rip out the old one so that he could get a good look at the new chassis! Either way the new floor is so much better – stronger and much thicker than the original flooring.
We used form ply to cover the whole floor of the caravan, and we also used it to put together some boxes to go over our wheel arches. Eventually we’ll obviously be covering the floor with something a little bit prettier, but for now this strong sturdy base is perfect to work on.

Our beautiful new paint job, so in love with this colour
Painting the van
Once all the new cladding was on the van, everything needed to be fully painted. But nothing is easy in a vintage caravan renovation, not even painting.
Our first hurdle was obviously the weather, we needed to wait for a sunny weekend, with a minimum temperature of about 15°C over both days, despite it being the middle of winter. The second hurdle was a little more out of our control, we actually got a tin of faulty paint – and within 48 hours of finishing the whole job it started to flake off.
Give. Us. A. Break.
Our second attempt was much more successful though, we were able to get a second sunny weekend in August (we were definitely surprised too) and our van is looking so pretty and all refreshed now! We were able to just spray the van in our backyard, with a Ryobi Air Compressor and a couple of the Ozito Gravity Feed Spray Guns. If you’re doing a primer before your top coat we highly recommend buying two spray guns for the different types of paint, because they do not like mixing with other paints.
We started with a layer of the Rust Guard SLS Etch Primer, followed by two layers of the Rust Guard Epoxy Enamel in gloss white. For our pink stripe, we chose a colour from the White Knights paint cards, and the paint wizards at Bunnings were able to whip it up for us in a pot of the epoxy enamel. All the paints are good for external use, weather resistant and some of the strongest paints you can use!
If you’re painting your van make sure you choose a weekend between 10°C and 30°C, generally somewhere in the low twenties is perfect. We chose a pretty still weekend as well, so there was no issue with paint flying around in the air – although Thom and both our Dads ended up with white eyelashes and eyebrows after they all took turns painting! We did three coats over 2 days, and then finished our pink layer a couple of weeks later. Leave between 3-4 hours between coats to make sure it’s dry enough to re-coat.

One of our biggest issues during the outside of our build was that we had to work around the weather. By the time we finally got our van back from the chassis builders and then had a couple more hiccups trying to source materials for the outside, we didn’t really get started on the outside of the van until about May, which was heaps later than we had planned.
So far, nothing about this renovation has been easy. There has been moments when we have literally cried and screamed because something went wrong or we didn’t know what to do. There was one day when Thom said he hated our caravan more than he hates cats. That was a very dark day.
But overall we are still having fun, and seeing the inside start to come together now is like watching our little vision actually come to life. Next year when we’re sitting in the sunshine and cooking our dinner outdoors all of these mini meltdowns would have been worth it.

We also have to say a HUGE thank you to our best mate Shane Blacklock (featured in many of the photos in this post), who has helped us so much during this build, and has kept Thom sane through many late night issues and freezing cold work nights. As well as our parents, who have come over to help whenever they could and always been so excited about every little thing that changes on the van! Your support and enthusiasm really keeps us going!
If you’re also renovating a vintage caravan we’d love to see your build! Drop us a DM on Instagram or leave us a comment below with your handle so we can check you out.
Nothing in this blog post is sponsored and we paid for all the materials and items listed and linked to in this post. We just wanted to share what worked for us in the hopes that it might make another persons van build a little easier!
Check out more of our van renovation
Pin for later >>

Happy travels,
 If you enjoyed this post, we'd love you to SHARE it for us!
Follow us on Instagram @EXPLORESHAW to see our latest adventures around Australia.
CHECK OUT OUR TRAVEL FAVOURITES:
If you enjoyed this post, we'd love you to SHARE it for us!
Follow us on Instagram @EXPLORESHAW to see our latest adventures around Australia.
CHECK OUT OUR TRAVEL FAVOURITES:
![Fujifilm X-T3 Mirrorless Camera]()
![Ultimate Weekends Australia]()
![La Tan Coconut Sunscreen]()
![Nikon Z fc Mirrorless Camera]()
![DJI Mavic 2 Pro Drone]()
![Frank Green Insulated Drink Bottle]()
![Manfrotto Tripod]()
![Lonely Planet Australia Travel Guide]()
![Will & Bear – Calloway Fawn Hat]()
![Sony RX100 VI Camera]()
![Bushmans with Sunscreen]()
![Havianas Slim Thongs in Rose Gold]()
![Australia Planning Map]()
![Casetify Tropical Palm Neon Sands iPhone Case]() CLICK HERE TO SUBSCRIBE to our newsletter, for blog posts and updates emailed straight to your inbox!
Use THIS LINK for $25 AUD off your next hotel stay with booking.com, or THIS LINK for $55 AUD off your first booking with airbnb.
CLICK HERE TO SUBSCRIBE to our newsletter, for blog posts and updates emailed straight to your inbox!
Use THIS LINK for $25 AUD off your next hotel stay with booking.com, or THIS LINK for $55 AUD off your first booking with airbnb.


28 Comments
Hi guys you are my inspiration, will be starting my 69 Viscount renovation in February after recovering from shoulder surgery . Hope you are up for a million questions. Cheers, Martin.
Thanks so much Martin! Absolutely we would love for you to ask us any questions you might have 🙂 we’ll be posting heaps more in the next few months about the inside and the electrics and everything so I hope it can help with your renovation too!
This is absolutely amazing! You guys did a great job! I’ve been thinking of getting a trailer and fixing it up. Maybe in a year or 2 but maybe sooner this post was super inspiring:) thanks for sharing!
Thanks so much Millie! Our plan actually started back in 2017 and has taken more than 2 years to do all our savings and start working on everything, so it’s good to have a long term plan! Hope you find your dream trailer! 🙂 x
Hey guys, loved your article. I have the same van and am doing the rebuild of the front windows as we speak. I too pulled out the entire front end to replace the window reveals, and now can’t quite get everything to fit back together…😭 I’m worried I’ve put the reveals in the wrong position. Do you have any more info or photos about how you got the front back together?
Hi Kara, thanks so much for your comment!
We absolutely had the same problem! In all honesty, we pretty much just jammed everything back together and hammered it until it went in! It was definitely VERY right getting it back in, but we just forced it. Unfortunately don’t have any photos, because those were some stressful days, but good luck!! Definitely known the pain of those windows, so I hope they all go back into place for you! X
Hi guys, your write up is awesome and so helpful (especially the window list).
Just wondering how your window are now, after a few month and plenty of red dirt? The nylon wheel will remove the anodising which will leave the natural alumimium exposed. Do you have to keep polishing them to keep them shiny? Or are they still the as when you did them?
Thanks! 🙂
Hi Dominic,
Thanks so much! For us, the windows were really the most difficult part of our van reno, so we wanted to share as much details as we could!
The windows have actually held up really well. The only thing we have an issue with is the window seals – really struggling to find something that keeps a tight seal and stop any dust getting inside, but the aluminium hasn’t had any issues! We haven’t polished them again since we’ve been on the road, just give them a wipe down when we give the whole van a wash and they’ve been holding up really well 🙂
Hi Emma
How much roughly was the chassis worth?
We have nearly exactly the same van given to us from our grandparents 😌
Hi Kristy, how exciting!! Our chassis cost us about $11,500 including all the add-ons we asked for 🙂 Good luck with your reno!
Such an inspirational page and I gained so much information. We are just one week in and currently tacking the curse of the windows. I have a question in relation to painting. Do you think its necessary to sand back the entire van to bear metal or can we simply fill our holes and then give everything a light sand? Many thanks.
Hi Samantha, thank you so much! 🙂 Omg good luck with your windows, they really are a killer! For the painting – we had some holes in the front of our van where we pulled the air-conditioner out. You shouldn’t need to sand it back to bare metal – we just filled the holes and then lightly sanded over the holes so they were flat with the rest of the cladding, and then painted right over the top! Worked perfectly, you can’t even see where those holes were any more! Good luck 🙂
Legends 🙌
I have a very old 22ft ish Millard, the roof is separating from the walls due to extensive wood rot. I need to replace the wooden ceiling and wall frame . I was concerned if I removed too much especially the upper cupboards the van would just fall apart but I notice you have removed the entire skin on one side of the van. How can I confirm that my van will stay in tact if I remove the internals on one side so I can access and replace the wooden frame. I plan to leave the outer skin in tact but what precautions do I need to take. The van leaks all round so I plan to repair one side at a time. It doesn’t have to look pretty.. Regards Mandy
Hi Mandy, at one stage our van was actually just a skeleton, we removed everything from the inside and the cladding on both sides. It stayed in tact during the rebuild, however our van did have a metal frame underneath everything, so unfortunately I am not sure what would happen with a wooden frame. Thom suggested cross bracing the frame of the caravan when you remove the inside so that it will stay in place and hold it’s shape while you replace the parts of the frame that have rotted. Only doing one side at a time is probably a good idea to keep the shape of the van. Hope that is helpful!
Hi Emma!
How much did you purchase your van for at the beginning?
Hi Rhys, we paid $9,000 for the van before we started. 🙂
Hi,
Great Job!
Where did you source the exterior trim around the van?
Hi Michael, we actually used the original trim for the van! We just took it off, gave it a good polish and put it back on over the new cladding. 🙂
Hi Emma, great work on the van! In regards to painting the outside, how much did it cost roughly? Also, where did you find best to purchase products like interior trim? Thank you for your help.
Hi Bek! I think we went through a couple of big cans of white paint and then just one of the pink for the outside, so it wasn’t too much in the end! Almost everything for our build came from either Bunnings or Caravans Plus 🙂
Hi Emma – thank you for an amazing & comprehensive article !!!
I’m try to renovate on onsite van and was looking for some guidance with the roof and windows mainly ! Roof leaks and I want bigger windows !
I’m going to clean the outside and match colours to repaint – it all seems quite daunting !
Are their people that specialise or do I contact a regular roofer or handyman ?
Thank you
Hi Veronica,
How exciting that you’re renovating your van! Unfortunately, I am not much help for people that specialize in things! Thom did all the work himself, we only got help from others with our plumbing and electricals. Maybe ask the site where your van is parked if they have any recommendations for caravan repairers? That might be the best place to start? Good luck! 🙂
Hi! What a massive effort, well done! Where did you source the J rail for the exterior? I’m having a hard time finding anything to reseal the edges of the caravan
Thanks Jolene! We actually used the original j rail on our van, we just gave it a clean and polish before we put it back on. Sorry we couldn’t be more help here!
hi there Emma, by adding the weight of the solar panels and air conditioning unit, what measures did you take or do to the roof structure, during the rebuild,?? i’m thinking the bouncing around on roads and rough travel at times, would eventually compromise, the roof structure, might cause the van roof to sag, even..!! or possibly even caving in from the constant bouncing of these components on the roof of the van.. looking at doing the same in my van .. any problems structurally??
Hi Stephen,
We gave the roof a new steel frame before we added the solar panels and air conditioner to the roof. You’re right, the old one absolutely would not have been able to handle the weight as it was pretty much rotted wood when we got it! We replaced the old beams with steel beams in pretty much the same positions, as well as left anything from the old roof that was still structurally okay just for a bit extra. We haven’t had any issues so far, after 2 years now and many many bumpy dirt roads the roof is holding up great! 🙂
Awesome build! We’re currently starting a build on a vintage style mobile bar. This blog post has been super helpful. We reached out to Allytech to ask about cladding but wondering where you guys sourced your aluminum edge mould that goes around the outside edging of your whole van. (I think that’s what it’s called). We’d appreciate any recommendations. Thanks!